
Paint chips are common in homes, especially around doors, corners, baseboards, furniture and heavily used areas. A small damaged spot may seem like a simple cosmetic issue, but painting directly over the chip is usually not the best repair. Loose paint needs to be removed and the surface prepared first so the new coating has a stable base.
The good news is that most small areas can be repaired without repainting an entire room. The process usually involves identifying the cause, removing loose paint, cleaning the surface, filling any depression, sanding the repair, applying primer when appropriate, and matching the new paint. Current guidance from Lowe’s and Home Depot supports this preparation-first approach.
Quick Information
| Quick Detail | Information |
| Topic | Repairing chipped paint |
| Main Surface | Painted walls, wood, trim and other surfaces |
| Common Causes | Impact, moisture, poor preparation, age and adhesion problems |
| Basic Tools | Scraper, putty knife, sandpaper and brush |
| Common Fillers | Spackle, joint compound, acrylic latex filler and wood putty |
| Recommended Sandpaper | Fine-grit; 220-grit is commonly used for repaired wall areas |
| Primer | Recommended for many repaired or exposed areas |
| Paint Type | Match the existing paint and surface |
| Repair Method | Scrape, clean, fill, sand, prime and paint |
| Best for Small Chips | Localized touch-up |
| Large-Scale Damage | May require wider repainting |
| Important Safety Issue | Possible lead paint in older homes |
| 2026 Guidance | Follow current manufacturer and EPA recommendations |
What Causes Chipped Paint?
Chipped paint occurs when the bond between the coating and the surface becomes weak or the paint is physically damaged. Common causes include accidental impacts, poor surface preparation, moisture, water leaks, unsuitable primer, temperature changes, aging coatings and incorrect painting techniques. Lowe’s notes that dirt or grime left on a surface before painting can interfere with adhesion, while moisture from leaks can cause paint to bubble, wrinkle and chip.
Understanding the cause matters because a cosmetic repair will not permanently solve an underlying problem. For example, if a plumbing leak is making the wall damp, applying fresh paint before repairing the leak can simply lead to another round of peeling or chipping.
Can You Repair Chipped Paint Yourself?
Yes, small and localized paint chips are generally suitable for a DIY repair when the underlying wall or surface is sound. You do not normally need to repaint the whole room for one small damaged area. Basic repairs can be handled with common supplies such as a scraper, putty knife, fine sandpaper, filler, primer and matching paint.
Larger areas are different. If the paint is peeling across a large section, the wall is damp, the substrate is damaged, or the same problem keeps returning, it is better to investigate the underlying condition before continuing with cosmetic repairs.
What Tools Do You Need?
A basic chipped-paint repair does not require a large collection of equipment. Useful supplies include a paint scraper, putty knife, fine-grit sandpaper or sanding sponge, soft brush, clean cloth, suitable filler, primer and matching paint. Depending on the surface, you may also need painter’s tape, a drop cloth, gloves and eye protection.
The exact filler depends on what you are repairing. Wood putty is appropriate for many wooden surfaces, while spackling or suitable acrylic-based fillers can be used for certain wall repairs. Always follow the product manufacturer’s instructions because products differ in their intended applications.
Check the Damage First
Before touching the damaged paint, inspect the surrounding area carefully. Look for additional loose edges, bubbling, staining, dampness, cracks or signs that the damage extends farther than the visible chip. If the paint is near a bathroom, kitchen, window, ceiling, pipe or exterior wall, moisture should be considered as a possible cause.
Lowe’s specifically recommends checking for water leakage before repairing chipped or peeling paint. If moisture is responsible, fix the source first and allow the surface to dry before repairing the coating.
Protect the Work Area
Prepare the area before scraping or sanding. Move nearby furniture where possible, cover remaining items and protect the floor with a drop cloth or tarp. Painter’s tape can be used around trim and other areas that should remain clean.
If the damaged spot is high on a wall, use a stable ladder on a level surface rather than stretching or leaning from an unsafe position. Basic preparation makes the repair cleaner and reduces the chance of creating additional damage while working.
Remove Loose Paint
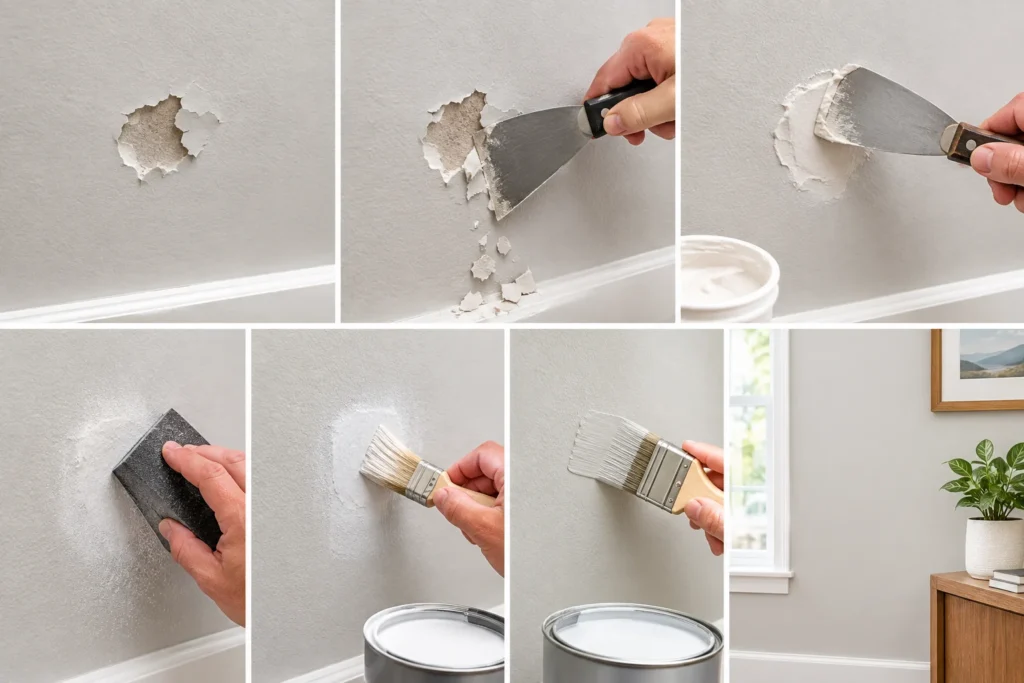
The first actual repair step is to remove paint that is no longer firmly attached. Use a paint scraper or putty knife and work carefully around the damaged section. Lowe’s recommends removing the larger loose pieces first and then working toward smaller flakes, while taking care not to gouge the underlying surface.
Do not stop simply because the largest chip has fallen away. Run the edge of the scraper gently around the damaged area and check whether the surrounding paint is secure. Any coating that remains loose should be removed before filling or painting.
Clean the Surface
After scraping, remove the dust and small particles left behind. A soft brush or clean cloth can help clear the area before applying filler or primer. The surface should be clean and dry so that repair products can adhere properly.
If the wall contains grease, oil or other stubborn residue, additional cleaning may be necessary. Home Depot notes that kitchen walls can sometimes require a stronger cleaning approach because dust may combine with oils, while Lowe’s recommends cleaning walls before painting so dirt does not interfere with the new coating.
Fill the Damaged Area
If removing the paint leaves a shallow depression, use an appropriate filler to restore a smooth surface. For interior drywall imperfections, spackling or suitable joint compound can be used. For wooden trim and similar surfaces, wood filler or wood putty may be more appropriate. Lowe’s recommends choosing the filler according to the substrate and type of damage.
Apply only enough material to bring the damaged area close to the surrounding surface. A very thick application can take longer to dry and may require more sanding. For deeper damage, multiple applications may be preferable to trying to fill everything with one heavy layer.
Let the Filler Dry
Allow the filler to dry according to the manufacturer’s instructions before sanding. Drying time varies according to the product, thickness and environmental conditions. Lowe’s notes that some spackling products can take a day or two to dry completely, while some wood fillers may dry within a few hours.
Do not rush this stage. Sanding or painting filler that has not dried properly can create an uneven repair and may cause additional surface problems.
Sand the Repair Smooth
Once the filler is completely dry, lightly sand the area until it is flush with the surrounding surface. Home Depot’s current wall-priming guidance recommends very fine 220-grit sandpaper or a sanding sponge for smoothing repaired areas.
The goal is not to remove large amounts of surrounding paint. Instead, create a gradual transition between the repaired section and the existing surface. Run your fingers gently across the area after sanding to check for a noticeable ridge or depression.
Remove Sanding Dust
Sanding leaves fine particles that can interfere with primer and paint. After smoothing the repair, remove the dust using an appropriate clean cloth, sponge or other method recommended for the surface.
Do not paint over visible sanding dust. A clean surface gives the primer and topcoat a better opportunity to adhere evenly and reduces the chance of rough particles becoming trapped in the finish.
Do You Need Primer?
Primer is particularly useful when the repair exposes bare drywall, bare wood or another porous surface, or when filler has been applied. Home Depot explains that porous surfaces can absorb paint unevenly and that primer can improve adhesion and produce a more uniform finish. Its September 2026 guidance also recommends primer for repaired areas in many situations.
Lowe’s updated primer guidance similarly identifies stained or repaired areas, bare drywall, bare wood and certain high-gloss surfaces as situations where primer can be important.
For a tiny chip where the original paint remains intact and the color is simply being touched up, primer may not always be necessary. The condition of the substrate and the paint manufacturer’s recommendations should guide the decision.
Choose the Right Primer
The primer should be compatible with both the surface and the paint you plan to use. Different primers are formulated for drywall, wood, masonry, stains, glossy coatings and exterior applications.
Lowe’s current 2026 primer guide emphasizes that not all primers are interchangeable. For example, exposed or weathered wood may require a different primer strategy than a repaired interior drywall surface.
Using the correct primer is especially important when the damaged area exposes a different material than the surrounding painted surface.
Match the Paint Color
A repair can be technically perfect and still remain visible if the new paint does not match. The best starting point is usually the original paint left over from the previous job, provided it has been stored properly and still matches the wall.
If the original can is unavailable, a paint retailer may be able to create a closer match using a physical sample. Remember that paint can change appearance over time because of sunlight, cleaning, aging and other environmental conditions.
Match the Sheen
Color is only part of the match. Paint sheen also affects how visible a repair will be. A new patch using the correct color but a different sheen can reflect light differently from the surrounding wall.
This is one reason small touch-ups can sometimes remain visible even when the color appears close. When possible, match the existing finish—such as flat, matte, eggshell, satin or another appropriate sheen—rather than focusing on color alone.
Use the Right Applicator
The application method can affect the texture of the repair. A small brush can work well for a tiny chip, while a small roller may blend better when the surrounding wall has a roller-applied texture.
For the most natural result, use an applicator that produces a texture similar to the existing surface. A brush applied to a heavily roller-textured wall can leave a visibly different pattern even when the color is correct.
Apply the Paint
Once the primer has dried, apply the matching paint in a thin, controlled layer. Avoid flooding the repair with paint because excessive paint can create a raised spot that remains visible after drying.
For a small chip, begin in the center of the repair and gradually work toward the surrounding painted area. Light coats are easier to blend than one heavy application, particularly when you are trying to reproduce an existing finish.
Feather the Edges
Feathering helps reduce the visible boundary between old and new paint. Instead of stopping abruptly at the edge of the repaired area, use lighter strokes as you move outward.
This technique is particularly useful for small touch-ups. A hard square or circular edge can catch the light and reveal the repair, while a softer transition can make the new paint less noticeable.
When Should You Repaint the Whole Wall?
A localized touch-up is appropriate when the damage is small and the surrounding paint remains in good condition. However, repainting the whole wall can produce a better result when there are many chips, significant fading, widespread peeling or obvious differences between old and new paint.
Sherwin-Williams guidance recommends painting to a natural break where possible. A corner, doorway or other architectural transition can make it easier to create a consistent finish than trying to blend a large patch in the middle of an open wall.
How to Repair Chipped Paint on Wood
Wood requires a slightly different repair process because the damaged area may expose the wood beneath the coating. After removing loose paint, clean the surface and use a suitable wood filler or wood putty where material is missing.
Once the filler dries, sand it smooth and prime exposed wood when appropriate before applying the finish coat. Lowe’s current primer guidance specifically recommends additional preparation for painted wood with chipped paint or exposed wood.
How to Repair Chipped Paint on Trim
Trim, molding and baseboards are particularly prone to chips because they receive frequent contact from furniture, vacuum cleaners, shoes and everyday activity. Small damaged areas can usually be repaired with a suitable filler, careful sanding and matching paint.
For deeper corner damage, rebuilding the shape with wood filler or another appropriate repair compound may be necessary before painting. The repaired edge should be completely dry and smooth before the finishing coat is applied.
How to Repair Chipped Exterior Paint
Exterior paint requires more attention because the surface is exposed to rain, sunlight, temperature changes and moisture. Before repainting, inspect for water intrusion, damaged wood, cracks and deteriorated caulking.
Exterior repairs should use products intended for exterior conditions. Lowe’s recommends acrylic latex filler for certain exterior wall repairs and emphasizes allowing the material to dry before sanding and painting.
What If the Paint Keeps Chipping?
Repeated paint failure is a sign that something more than a cosmetic touch-up may be happening. Moisture, poor adhesion, contaminated surfaces, incompatible coatings or inadequate preparation can cause a new repair to fail again.
If the same area repeatedly chips, investigate the wall rather than continuing to apply new paint. A leak around plumbing, a window or an exterior wall can cause repeated damage until the moisture source is corrected. Lowe’s specifically identifies moisture and inadequate surface preparation as common causes of peeling and chipping.
What About Old Lead Paint?
Safety becomes especially important in older properties. In the United States, homes built before 1978 may contain lead-based paint. Scraping and sanding can disturb old coatings and create hazardous dust.
Lowe’s recommends checking older homes for lead paint before disturbing the surface, while the EPA maintains specific requirements and guidance for lead-safe renovation, repair and painting work.
If you suspect lead-based paint, avoid casually sanding or scraping large areas. For covered renovation work on pre-1978 housing, EPA rules may require a properly certified contractor.
Common Mistakes to Avoid
One of the biggest mistakes is painting over loose paint without scraping it first. The new coating is only as stable as the surface underneath it. Another common problem is skipping primer on repaired or exposed areas, which can produce uneven absorption and a visible patch.
Rushing the drying stage is another issue. Filler and primer need adequate drying time according to their product instructions. Sanding too early or applying another coating too soon can compromise the finish.
How to Make a Touch-Up Look Professional
The best results come from treating the repair as a small version of a complete painting project. Prepare the surface carefully, make the repair level, remove dust, use primer where appropriate, match the paint and blend the edges.
Home Depot’s current guidance emphasizes that primer can improve adhesion and create a more uniform finish, while Lowe’s recommends smoothing repaired areas before priming and painting.
The extra preparation may take more time than simply brushing paint onto the chip, but it is what helps the repaired section blend into the surrounding surface.
Final Thoughts
Learning how to repair chipped paint is mostly about proper preparation. A small chip can often be handled without repainting an entire room, but the damaged paint should first be removed and the underlying surface inspected.
For a standard interior repair, the process is straightforward: identify the cause, scrape loose paint, clean the area, fill any depression, allow the filler to dry, sand it smooth, prime exposed or repaired surfaces when needed, and apply matching paint. Current Lowe’s and Home Depot guidance supports this general approach. The most important exception is recurring damage. If moisture, a leak, widespread peeling or another underlying problem is responsible, fixing only the visible paint will not provide a lasting solution. And when working on older U.S. homes, potential lead-based paint should be taken seriously before scraping or sanding.
Frequently Asked Questions
Can I paint directly over chipped paint?
It is better to remove loose paint first. Painting over unstable edges can leave the new coating vulnerable to the same peeling or chipping problem.
Do I need to use primer after repairing a paint chip?
Primer is commonly recommended when the repair exposes bare drywall, wood or another porous surface. For a tiny touch-up on an otherwise sound painted surface, primer may not always be necessary.
What sandpaper should I use?
For smoothing repaired wall areas, fine-grit sandpaper such as 220 grit is commonly recommended. Sand gently rather than removing excessive material from the surrounding surface.
Why does my paint keep chipping after I repair it?
Repeated chipping can indicate moisture, poor adhesion, contamination, inadequate preparation or another underlying problem. Find and correct the cause before repainting the damaged area.
Can I repair chipped paint on wood?
Yes. Remove loose paint, clean the surface, use an appropriate wood filler or wood putty when material is missing, sand it smooth, prime exposed wood when necessary, and apply a compatible finish.
How do I make a paint touch-up less noticeable?
Use paint that matches the color and sheen, choose an applicator that reproduces the existing texture, and feather the new paint into the surrounding area rather than creating a hard edge.
Is chipped paint dangerous?
The chip itself is usually a cosmetic problem, but old paint can be a safety concern if it contains lead. U.S. homes built before 1978 deserve particular caution before scraping or sanding painted surfaces.
Should I repair or repaint the entire wall?
A small isolated chip usually needs only a touch-up. Multiple chips, widespread peeling, fading or noticeable color differences may make repainting the entire wall a better option.
Continue Exploring Our Latest Article: Tips for Choosing a Paint Color That Works for Your Home