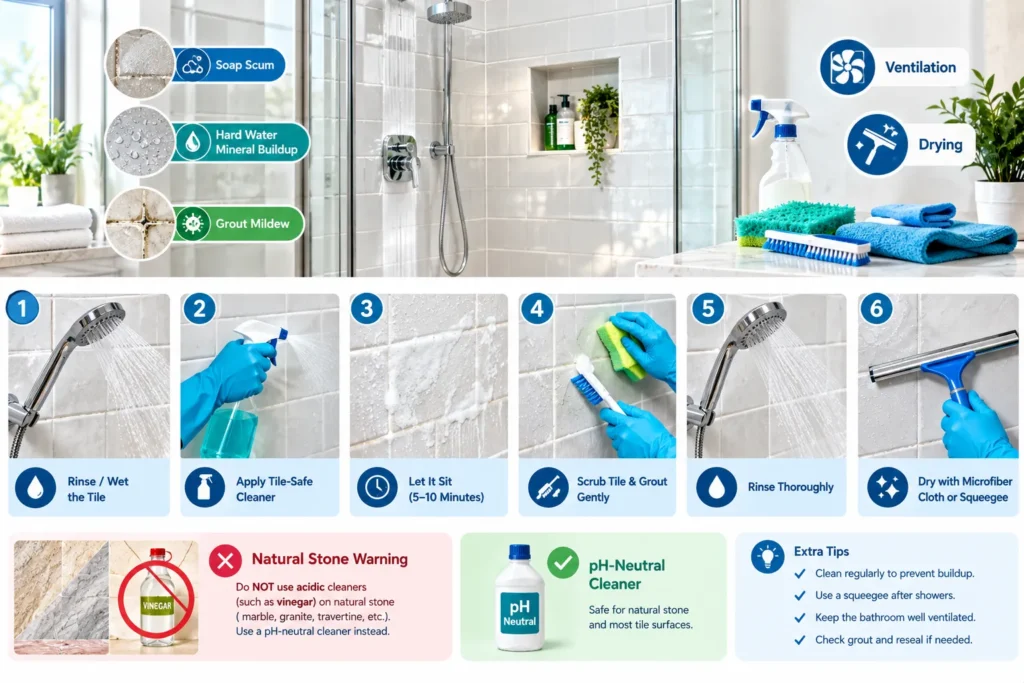

A clean shower can make the entire bathroom feel fresher, but shower tiles can quickly collect soap scum, body oils, mineral deposits, and grime. The good news is that regular maintenance does not need to be complicated. The right cleaning method mainly depends on the type of tile and grout installed in the shower.
Ceramic and porcelain tiles are generally easy to maintain, while natural stone needs more careful product selection. Manufacturers such as Daltile recommend cleaners that are safe for the specific tile and grout, followed by thorough rinsing to remove residue.
Quick Cleaning Checklist
| Step | What to do |
| 1 | Identify the tile material |
| 2 | Remove loose dirt and hair |
| 3 | Choose a compatible cleaner |
| 4 | Apply it according to the label |
| 5 | Gently clean the tile |
| 6 | Give extra attention to grout |
| 7 | Rinse with clean water |
| 8 | Remove excess water |
| 9 | Allow the shower to dry |
| 10 | Repeat regularly |
Identify Your Shower Tile
Before cleaning, find out what material you have. Ceramic, porcelain, glass, and natural stone should not automatically be treated the same way.
Ceramic and porcelain are common shower-wall choices because they are durable and relatively easy to maintain. Natural stone, including marble, limestone, and travertine, needs more attention because some stones are sensitive to acidic cleaning products.
If you are unsure about the material, check the manufacturer’s documentation or ask the tile supplier before using a strong cleaner.
Remove Loose Dirt
Start by removing hair, dust, and other loose debris from the shower.
A soft microfiber cloth, soft-bristle brush, or suitable vacuum attachment can be useful for dry debris. This simple step prevents loose particles from being dragged across the surface when you begin wiping or scrubbing.
MSI recommends removing loose debris from ceramic and porcelain wall tiles before moving on to wet cleaning.
Prepare the Cleaning Solution
For ordinary ceramic or porcelain shower tiles, use a tile-safe cleaner according to the manufacturer’s instructions.
Some surfaces can be cleaned with mild household products, while heavier buildup may require a dedicated tile-and-grout cleaner. Daltile recommends using a cleaning product that is specifically safe for both the tile and grout and following its required dilution and dwell time.
Avoid making the solution unnecessarily strong. More concentrated cleaner does not automatically mean better cleaning and can leave unwanted residue.
Clean the Tile Surface
Apply the appropriate cleaner to a manageable section and wipe or gently scrub the surface.
For routine cleaning, a soft sponge, microfiber cloth, or appropriate soft brush is usually a good starting point. Work from one section to another rather than applying cleaner to the entire shower and allowing some areas to dry before they are rinsed.
MSI recommends warm water and a damp sponge or cloth for routine ceramic and porcelain wall-tile maintenance.
Focus on Soap Scum
Soap scum is one of the most common problems in a shower. It develops when soap residue combines with water minerals, oils, and other material left on the surface.
For ceramic and porcelain, a suitable tile cleaner designed for soap scum can be used when ordinary cleaning is no longer enough. Daltile notes that heavier cleaning products can be selected to remove soap scum, body oils, mildew stains, grease, and similar buildup.
Do not assume that a stronger acid-based cleaner is necessary. The tile material should determine which product is appropriate.
Clean the Grout
Tile may look clean while the grout lines remain dark or discolored.
Grout needs its own attention because its joints can collect dirt and surface buildup more readily than the tile. Daltile recommends periodic grout cleaning and notes that heavy-duty grout cleaners may be needed when ordinary maintenance is not sufficient.
Use a grout-compatible cleaner and an appropriate brush or cleaning tool. Avoid aggressive scrubbing that could damage the grout surface.
Rinse Thoroughly
After cleaning, rinse the shower with clean water.
This step is important because leftover cleaner can create a film or slippery residue. Daltile specifically recommends finishing with clean water and removing excess water after cleaning.
Never assume that a cleaner has worked properly simply because the surface looks shiny. Residue left behind can attract additional dirt and make the surface harder to maintain.
Dry the Tiles
Once the shower has been rinsed, remove excess water.
A clean microfiber towel or squeegee can help reduce water spots and moisture remaining on the surface. Regular drying is especially helpful in areas with hard water because repeated evaporation can leave mineral deposits behind.
The Natural Stone Institute recommends using a squeegee after shower use to help minimize soap-scum buildup on stone surfaces.
Remove Hard Water Deposits
Hard water can leave white or cloudy deposits on shower surfaces.
The appropriate treatment depends on the tile. A cleaner designed for the specific material can help remove mineral buildup, but acidic products should not be used automatically.
This is especially important for natural stone. Acid-sensitive stones can be etched by acidic substances, meaning the damage affects the surface itself rather than simply leaving a removable stain.
Be Careful With Natural Stone
Natural stone requires a different cleaning approach from many manufactured tiles.
The Natural Stone Institute recommends neutral cleaners, stone soap, or mild dishwashing detergent with warm water for routine stone care. The organization also recommends rinsing thoroughly and drying the surface after washing.
The stone’s composition matters because calcareous materials such as marble, limestone, and travertine are particularly vulnerable to acids.
Should You Use Vinegar?
Vinegar is often suggested as a homemade bathroom cleaner, but it is not a universal solution for shower tiles.
The Natural Stone Institute warns that vinegar and other acids can dull or etch calcareous natural stones. It specifically states that vinegar should never be used on marble, limestone, or travertine.
For ceramic or porcelain, follow the tile manufacturer’s cleaning recommendations instead of assuming that a homemade vinegar solution is suitable for every installation.
Avoid Abrasive Scrubbing
A rough cleaning pad can create problems even when the cleaner itself is appropriate.
For porcelain and other premium surfaces, MSI warns against abrasive cleaning agents and tools such as steel wool and hard-bristle brushes. Certain abrasive pads can dull the finish.
Start with the least aggressive cleaning method that can handle the problem. Increase cleaning strength only when necessary and only when the manufacturer permits it.
Handle Mold and Mildew Carefully
Mold-like discoloration can appear around grout joints, corners, and areas that remain damp.
Do not automatically treat every dark mark with the strongest chemical available. First determine whether you are dealing with ordinary dirt, mildew, mineral deposits, damaged grout, or another problem.
If the same area repeatedly develops growth or discoloration, ventilation and persistent moisture may need attention rather than simply adding more cleaning chemicals.
Improve Bathroom Ventilation
Cleaning alone cannot solve every shower-maintenance problem.
Good ventilation helps remove moisture from the bathroom after bathing. Excess humidity can contribute to conditions that encourage mildew and persistent dampness.
Using the bathroom exhaust fan appropriately and allowing the shower area to dry can make routine cleaning easier. A squeegee or towel can also remove water that would otherwise remain on the tile and glass.
Clean Regularly
A regular light-cleaning routine is easier than waiting for heavy buildup.
After using the shower, remove excess water from the walls where practical. Then perform a more thorough cleaning according to how quickly soap scum and other deposits appear.
Cleaning frequency depends on usage, water quality, ventilation, tile type, and household habits. A heavily used family bathroom may need attention more frequently than a lightly used guest bathroom.
Test New Cleaners First
Before applying an unfamiliar cleaning product across the entire shower, test it in a small, inconspicuous location.
This is particularly important for natural stone, polished surfaces, textured tiles, colored grout, and specialty finishes.
Daltile recommends testing cleaning products on a small area before using them more broadly.
If the test area becomes dull, discolored, etched, or otherwise damaged, stop using the product.
Never Mix Cleaning Chemicals
Do not combine different household cleaning products unless the manufacturer explicitly states that they can be mixed.
Some combinations can produce dangerous chemical reactions. The Natural Stone Institute specifically warns that ammonia and bleach must not be mixed because the combination creates a toxic gas.
Read product labels carefully and provide suitable ventilation when using cleaning chemicals.
Deep Clean Heavy Buildup
If ordinary cleaning cannot remove years of accumulated soap scum, body oils, mildew staining, or grime, a stronger tile-and-grout cleaning process may be necessary.
For ceramic and porcelain, Daltile recommends professional-strength tile and grout cleaners for moderate or heavy soiling when appropriate. The product should be compatible with the installation and used according to its instructions.
Severely neglected showers may require professional cleaning rather than increasingly aggressive household chemicals.
Keep Grout in Good Condition
Clean grout does not stay clean simply because the tile around it is maintained.
Cement-based grout can be porous and may benefit from an appropriate penetrating sealer depending on the installation. Epoxy grout behaves differently and generally has greater resistance to moisture and staining, meaning it does not normally require the same sealing treatment.
Sealing, however, does not eliminate the need for routine cleaning.
Clean Glass Separately
If your shower includes a glass door or enclosure, treat the glass according to its manufacturer’s care instructions.
Avoid transferring abrasive tile-cleaning products onto glass. Daltile recommends non-abrasive cleaners for glass and metal tile surfaces.
Keeping the glass dry after showering can also reduce visible water spotting.
Common Cleaning Mistakes
Several simple mistakes can make shower maintenance harder.
Using the wrong chemical for the tile is one of the biggest problems. Vinegar on acid-sensitive stone, abrasive pads on polished surfaces, excessive cleaner concentration, and failure to rinse can all create avoidable issues.
Another common mistake is ignoring the grout. Even when the tile surface looks clean, dirty grout can make the entire shower appear neglected.
A Simple Cleaning Routine
For most ceramic or porcelain shower installations, a practical routine is straightforward.
Remove loose debris first, apply a suitable cleaner, gently clean the tile and grout, rinse thoroughly, and remove excess water. For daily maintenance, a quick wipe or squeegee after showering can reduce the amount of buildup that develops between deeper cleanings.
The goal is consistent maintenance rather than aggressive cleaning.
Cleaning Method by Tile Type
| Tile or surface | Recommended approach | What to avoid |
| Ceramic | Tile-safe cleaner, soft sponge or cloth, rinse | Unapproved harsh chemicals |
| Porcelain | Suitable cleaner, gentle cleaning, thorough rinse | Abrasive tools and unsuitable chemicals |
| Natural stone | Neutral stone cleaner and soft cloth | Acids and inappropriate abrasive products |
| Marble | Stone-safe neutral cleaner | Vinegar and acidic cleaners |
| Limestone | Non-acidic stone cleaner | Acid-based products |
| Travertine | Neutral stone-care product | Vinegar and other acids |
| Glass | Non-abrasive glass-safe cleaner | Abrasive pads |
| Grout | Compatible grout cleaner and periodic maintenance | Aggressive scrubbing or unsuitable chemicals |
These differences are important because there is no single “best shower tile cleaner” for every surface. Manufacturer instructions should take priority over generic cleaning recipes.
Final Thoughts
Learning how to clean shower tiles starts with using the right method for the material. Ceramic and porcelain are generally straightforward to maintain with suitable tile cleaners, gentle tools, proper rinsing, and regular care.
Natural stone requires more caution. Marble, limestone, and travertine can be damaged by acidic products, which is why the Natural Stone Institute recommends non-acidic cleaning methods for acid-sensitive stone. The simplest long-term approach is to clean regularly, remove excess water, keep grout maintained, avoid abrasive tools, and never mix cleaning chemicals. A few minutes of routine care can prevent the heavy buildup that makes shower cleaning much more difficult.
FAQs
What is the best way to clean shower tiles?
Use a cleaner approved for your specific tile, gently scrub with an appropriate soft tool, rinse thoroughly, and remove excess water. Ceramic and porcelain generally require less specialized care than natural stone.
Can I use vinegar to clean shower tiles?
It depends on the tile. Do not use vinegar on marble, limestone, or travertine, because acids can etch these stones.
How do I remove soap scum from shower tiles?
Use a tile-compatible soap-scum cleaner and gently scrub the affected area. Heavy buildup may require a professional-strength tile and grout cleaner that is approved for the installation.
How do I clean shower grout?
Use a grout-compatible cleaner and an appropriate soft or non-damaging brush. Grout requires periodic cleaning because it can collect dirt and surface buildup more easily than the tile.
How can I keep shower tiles cleaner for longer?
Remove excess water after showering, maintain ventilation, and clean small amounts of buildup regularly. This reduces the need for aggressive deep cleaning later.
Continue Exploring Our Latest Article: Kitchen Cabinet Baseboard: Sizes, Materials, Installation and Toe Kick Guide